Instructions
Here is some general information to help you better understand how this
Virtual Tour Guide works. If you are using this
Guide for the first time, please take a few moments to read this chapter first
before going on to other areas
of the Guide. Reading chapter will
give you the basics on how our Guides are set up and will tell you how to get
the most out of the many features that are included.
PROOF READERS: THIS SECTION IS NEW AND STILL BEING
MODIFIED
So what is a Virtual Tour Guide and how does one use it? One reads
this Guide just like a book. However, unlike a book, it has many features
that cannot fit into a book. It also has more information than one
can get from watching a 30 or 60 minute travel video or film.
The primary purpose of this Guide is to help a traveler plan their trip to
the South Island of New Zealand. Our guide has the unique ability to show
the reader what various places look like, what there is to do there, and where
it is, so that they can decide which places to see or not see depending on their
interests. That way, would-be visitors can save time and money immediately
before they schedule and book their trip.
We refer to each individual section (i.e. webpage) in our guide as a
chapter. The page you are reading now, Instructions, is a chapter.
There is a chapter named Introduction and chapters for each of the areas of
interest in the guide such as Akaroa, Dart River and Milford Sound.
Except for the Introduction, each chapter is consistent with its layout and
features. They all contain the following:
| Brief Introduction |
The first paragraph of every chapter gives a brief summary
of this particular portion or destination in our virtual tour. |
| Things to see and do |
Briefly lists the highlights and main attractions of this
particular destination. |
| Chapter menu |
A menu of the sections within a chapter so
that you can click on an option and immediately jump to it. |
| Getting There |
This section explains how to get to this particular
destination. |
| What's There |
This includes written details about a destination.
Typically, each chapter covers several different subjects within this
section. Subjects include the different things to see, what to be
prepared for, what to expect, etc. |
| Photo Tour |
Every chapter has a collection of 30 to 50 pictures showing
you what the destination looks like. The Photo Tour lists all of the
pictures with a thumbnail and an explanation of the picture. See
Basic Functions below on how to use the Photo
Tour. The advantage of using the thumbnails is that you can pick which
picture you want to see in more detail, while passing by the ones that do
not interest you. Click here to
see one. |
| Slideshow |
If you don't care to click on every single thumbnail in the
Photo Tour, you can use the Slideshow which will automatically display
almost every picture. Typically, each slideshow includes about 30 of
the best pictures, but it doesn't include every single picture found in the
Photo Tour. Click here to watch one. |
| Interactive View Map |
This is a close-up map of the destination. It shows
all of the places of interest discussed in the Getting There and the What's
There sections. It also includes blue dots
that you can click on to display a picture of what an area looks like.
Click here to see one. |
| Interactive Google Map |
Utilizing on-line maps from Google, this is a special map
that has been programmed to point out the various places of interest along
the virtual tour. Refer to
Interactive Google Maps on how to use this feature.
Click here to watch one. |
| General Overview Map |
Shows the area or region that the chapter covers in relation
to an overall map of the South Island. The yellow shaded area on the
map shows the coverage of the Interactive View Map.
Click here to see one. |
So whether you enjoy reading, or if you would rather just sit back and watch
a slideshow or an animated map tour, this Guide can accommodate you either way.
There are additional functions that you will encounter while reading this Guide.
Some of these functions may already be familiar to you, as they are commonly
found on many websites. Examples of these functions are hyperlinks and
buttons. The next section explains these basic functions.
BEGIN STANDARD MATERIAL
All of our Guides work much like a website on the
Internet and have many of the same conventions. Use the scrollbars on the
right side and/or bottom of your screen to scroll through a Chapter and use the
Back button to go back to a previously viewed page. Here are a few
more standard features:
 |
Internet: To
use this Guide, you must always be connected to the Internet. Because
of some of the features in the Guide, we recommend using a "fast" Internet
connection.
|
|
|
Hyperlink:
When you see a word or words that are blue and
underlined like this, it is a hyperlink
and it behaves like a typical hyperlink used on the Internet. Click on it and
it will
take you to either another page or to a particular section within the current page.
Return from hyperlink: Click the Back button
or press the Backspace key on the keyboard to return to the pervious
page.
|
|
|
Photo Tour Photos:
The small photos
(thumbnails) shown in any of the Photo Tours can be made larger by
single-clicking on them. When you are done viewing them at the larger
size, click the Back button to return to the Photo Tour.
|
|
|
Maps: Each
Virtual Tour Guide includes several different types of maps.
|
|
|
Interactive View Maps: Our
Interactive View Maps offer two special
features. One is what we call our "blue dot"
feature. Click any of the blue dots on an Interactive View Map and you
will see a picture taken from that spot! The arrows on the dots point
in the direction that the picture was taken. The other special feature
of these maps is the easy-to-see "yellow line" we use to show you our route
for that particular hike or road trip.
|
|
|
Interactive Google Maps: Another type
of map uses live map data available from Google. This map is also
"animated" as it steps through the map, scrolling it as it goes
automatically, pointing out each feature explained in the main chapter.
There are controls available so that you can stop the animation and just
click on each point on the map for more information or show the entire
virtual tour. The normal buttons available from any Google Map, such
as Map, Satellite, Hybrid and Terrain, is also available. See
Using Interactive Google Maps
for more details.
|
|
|
Slideshows:
Most Photo Tours also have an associated
Slideshow. This makes the experience more hassle free as you can sit
back and watch a Slideshow without touching anything. The link or
option to select a Slideshow is found at the top of each chapter right next
to where the link for the Photo Tour is located. See
Using Slideshows for more details.
|
|
|
Picture Example:
Click [see picture] to see a picture of what is being explained. They say a picture is worth a thousand words!
|
|
|
Google Search:
There are some terms used in this Guide that may require
further explanation. The best way for anybody to learn about various
terms is to simply do a "Google search" on the Internet. When you see [Google
search] in the text, clicking on the hyperlink will open a new browser
window with Google already listing articles about the topic being discussed. |
What does 1024x768 mean? Before
viewing a Guide CD, we ask that you check your monitor display settings.
Your computer's display screen has the ability to let you view information at
different "resolutions". Typical resolution dimensions are: 640x480,
800x600, 1024x768, etc. The higher the dimension values (resolution), the
smaller the images get because more information is being displayed on the
screen.
We have found that our pictures look their best when your
screen resolution is set to 1024x768. If you don't know what resolution
your screen is currently set to, please take a moment to check and/or change it
before viewing the Sample Guide.
To check and/or change your computer's screen resolution,
follow these steps:
- Click Start.
- Click Settings.
- Click Control Panel.
- Double-click the Display icon.
- The Display Properties window is
displayed. Click the Settings tab located in the top
right of the window.
- In the Screen Area , click the
slider and move it left or right until you see 1024 x 768
pixels displayed.
- Click OK.
This should change your computer screen and give you the
best "look" for the pictures and text in your Virtual Guide CD.
Depending on the Internet browser you are using (i.e. Internet Explorer,
Firefox, etc.) and the security settings that you have set, you may experience
some obstacles which will not allow some of the features in this Guide to not
work properly.
When you first start up the Guide, a banner may appear alerting you to a
security restriction. This banner is known as the Information Bar.
It appears on top of the webpage and just below where you would type in an
Internet address. To clear the restriction, click on the Information Bar
and a pop-down menu will appear. Click on the All Blocked Content option.
See picture below for an example:
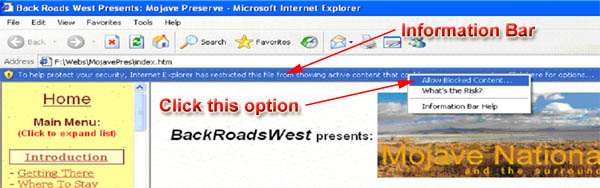
After you select this option, the Information Bar will disappear. If
you do not clear this restriction, the Main Menu of the Guide, found on the left
side of the webpage, will not function properly. Other features of the
Guide, such as the slideshow or interactive maps, may not also function
properly.
(Google is a registered trademark name of Google Inc.)
Throughout this guide, there will be references or links in the text to
search on Google's website and search engine. This will allow you to read
about and research more information on a given text in this guide.
When you see the link [Google search], click on it...it will always open in a new
window...
Need to explain more...
Most Chapters in this guide have a Slideshow. They will cycle through
most of the same photos that are included in that Chapter's Photo Tour.
Once the Slideshow begins, there is no interaction needed with the computer to view the
photos. If you wish, there are buttons at the bottom of the photo where
you can pause the Slideshow and then choose to go back and look at a previous
photo or choose forward to quickly scan through them. Below each photo is a short description of the scene
you are viewing.
Not all photos from the Photo Tour are included in a Slideshow, so be sure to
look through the Photo Tour in case you've missed any photos. Slideshows
typically include about 20-30 pictures, depending on the picture worthiness of
the Chapter.
The numbered list below describes each function found on a Slideshow page:
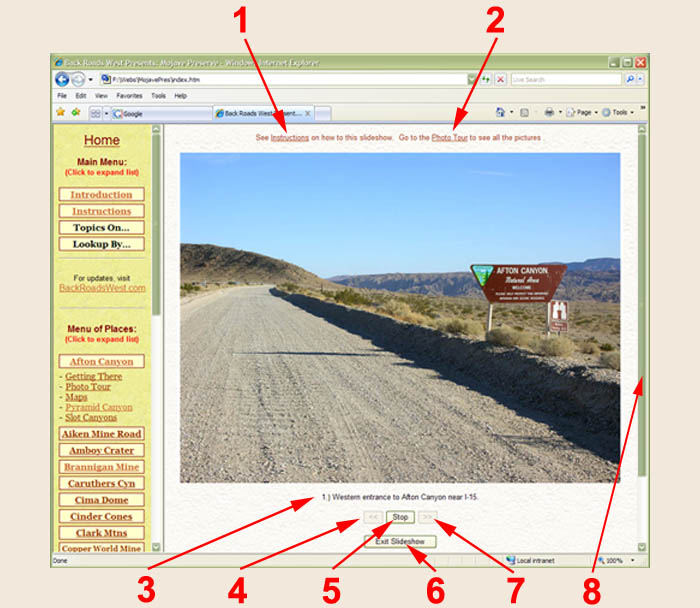
1. Click here to read these instructions.
2. Click here to view the Photo Tour for this
chapter. Remember that not all of the pictures belonging to a Chapter are
included in the Slideshow, but all of them are listed in the Photo Tour..
3. Shows the description of the displayed photo in
the Slideshow.
4. When in Stop (pause) mode (see #5), click here
to display the previous photo.
5. If this button says "Stop", click
here to pause the Slideshow. After clicking [Stop], the button will
display the word "Play". When the button says "Play", the Next (#7) and
Previous (#4) buttons will be enabled. Clicking on the [Play] button
resumes the Slideshow and the Next and Previous buttons are disabled.
6. Click here to exit the Slideshow and
return to the Chapter this Slideshow belongs to.
7. When in Stop (pause) mode (see #5), click
here to display the next photo.
8. Be sure to use the scroll bar to
reveal the photo's description (#3) and the other buttons (#4-7).
1. Map only works when your computer is connected to the Internet.
2. Tour begins immediately. A pop-up window appears with a
description and picture describing the place where the red dot is located.
3. Use the [Stop Tour] button to stop the tour, [Continue Tour] to
resume tour, [Play Again] to play tour again from the beginning and [Show Entire
Tour] to zoom map out to reveal the entire tour.
4. While the tour is
stopped, click on the red dot to see a more detailed description of the
location.
5. To change the type of map (i.e. street map, satellite view,
terrain), click on one of the white-colored buttons located in the upper-right corner
of the map.
6. To scroll
north/south/east/west, use the map control located in the
upper-left corner. To zoom in or out of the whole map, use the map control
located just under the scrolling control in the upper-left corner.
7. To "pan" the map in any direction, position your mouse cursor over the map (cursor
is an open hand symbol). Click and hold the mouse button
down (cursor changes to a closed hand symbol) while moving your mouse in the desired direction.
8. To zoom in or out of a specific place on the map, position your mouse over
the desired area. Turn the mouse wheel towards you to zoom out and away from
you to zoom in.
For more directions, go to the
Google Maps help page.
At this time, the only "printer friendly" versions
of the information in this Guide are the Printer
Friendly Trip Logs. Used in conjunction with Road Trips, these pages
are "printer friendly" because they are mostly black and white text and have no
color pictures. This makes them quick to print and cost effective for you.
We realize that Road Trips aren't the only things that
you'll want to make a printed copy of so we have included instructions below.
Use these printing instructions for any piece of information that you'll need
for your journey but please remember that all information, including photographs
and maps, are copyrighted material and that permission to reproduce them is only
given for the sole purpose of your own personal use. Also remember that
our maps do not print well on standard size printer paper (see
Maps above).
Once the Virtual Guide CD is loaded and you have
clicked-on (opened) the Chapter that you want to print, use the menu bar at the top of your screen and
click File Þ
Print Preview. The Print Preview
window is now displayed. Please note that our example below is from
Internet Explorer, version 6.0 so, if you have a different version, the screens
may look slightly different.
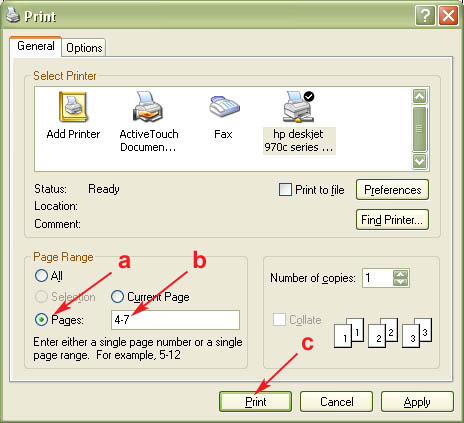
Follow the numbered directions below that correspond with
the red numbers in the picture example:
1. Click the
arrow and select "All frames individually".
2. Click the
arrow and choose how you would like the frames (pages) displayed. You can
experiment with the different choices but we recommend "Two Pages".
3. Now that the
pages are displayed, click on these arrow buttons to move forward and backward
through the individual pages. Identify the pages that you want to print
and write down the page numbers.
4. Once you have
written down the page numbers that you want to print, click
the "Print" button and the Print window is displayed.

4a. This
Print window is now displayed. Click the "Pages" option.
4b. Type the page numbers that you
want to print.
4c. Click the "Print" button. Be
sure to have your printer turned on!
Please remember that these are not "printer friendly"
versions and that pages printed in this way will be in color, as you see them in
the Print Preview. We hope to provide you with more "printer friendly"
versions on the different topics in future updates of our Guides.
Back to Top of Page or Home
| 